Safe Firmware Upgrade
RBI packaged firmware OR squashfs/jffs2 raw bank dumps ONLY!
If your device uses the U-boot bootloader and you have a firmware file ending in .pkgtb, or raw bank dumps of ubifs/squashfs filesystems, do NOT use ths procedure. Use the Safe Firmware Upgrade (U-boot bootloader) instructions instead.
This simple guide will show you how to clean-up your rooted Gateway modifications and safely change firmware avoiding or handling any possible issues, as well as preserving existing root access. If your Gateway is not rooted already or you don't know what rooting is about, go to Home page.
This is the way you should regularly clean-up your modifications and install firmware upgrades when available. Firmware flashing via sysupgrade or BOOTP is not safe as it will remove root access.
This method will use direct partition writing to flash the firmware exactly where it needs to be and to guarantee root. Read here for extra details about different flashing methods.
Get prepared
What you will need:
-
A rooted Gateway in working order
-
Make sure you can eventually get a copy of your current firmware
- Check if it's available from Firmware Repository
-
A way to access this documentation in case of issues
- If this is your main Gateway, a mobile internet connection is recommended
-
Your current bank planning. Check and take note of firmware flashed, active and booted banks after running:
find /proc/banktable -type f -print -exec cat {} ';' -
The firmware image to flash, either RBI file or raw bank dump
- Pick one for your model, of whatever Type, from the Firmware Repository
Things to know
Will root access be preserved?
- Well, that is the point of this guide, however we can't guarantee root access preservation won't break in future firmwares.
On which bank will the new firmware be flashed?
- The booted one, the currently installed firmware will be overwritten. Make sure it is listed in our Repository before overwriting!
Will the upgrade affect my bank planning?
- No it won't, there won't be any bank switches.
Will any setting and customization be lost?
- It depends on the firmware you want to flash and how much you would like to be safe, read further.
Risky exception: Missing Type 2 RBI
In the unfortunate case that there are no Type 2 RBI firmware files available for your model, you are not in a safe position. If something goes wrong with this guide, using BOOTP recovery with non-Type 2 images will bring you into a working unrootable firmware. In such a situation, upgrading is not recommended. Let expert users test this guide on that new firmware first.
Preparing Firmware
Check the file format your new firmware is. It could be either an RBI file or a raw bank dump.
RBI file
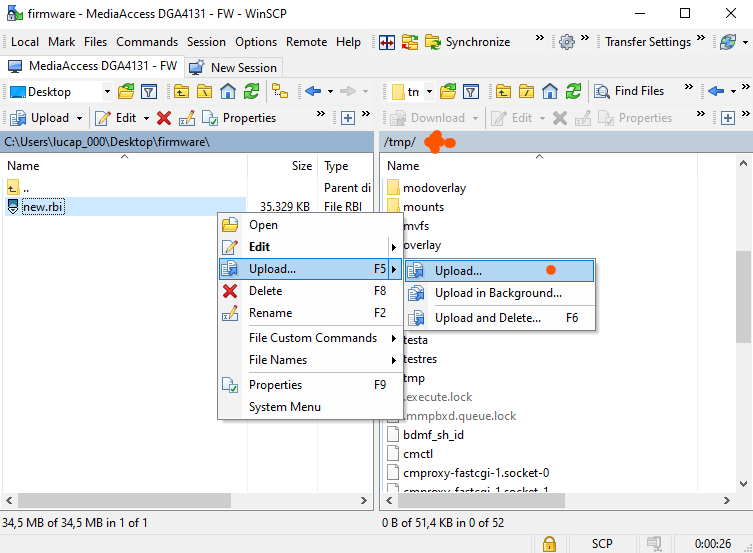
Take the RBI file to flash and move it to /tmp/new.rbi by SCP. Here is an example from WinSCP, but you can use any SCP client.
Run this command to unpack the RBI image, will take a while:
cat "/tmp/new.rbi" | (bli_parser && echo "Please wait..." && (bli_unseal | dd bs=4 skip=1 seek=1 of="/tmp/new.bin"))
Something went wrong?
If the above command causes the gateway to reboot, use an USB drive instead. Move the RBI file into the USB drive and use its mount path in place of /tmp. Read issue #128 for more details. This is usually needed when there is not enough free RAM to perform firmware unpacking in memory.
Raw bank dump
Download and extract the raw bank image, and move this file into /tmp/new.bin folder by SCP or USB drive.
Clean-up
It is recommended to clean-up every changes to files and configs whenever you are either downgrading or moving to a firmware of a different brand.
If you are just flashing a minor firmware update of the same brand, you could take the short (and unsafe) path by skipping over to Flashing firmware. Please note, if anything goes wrong or you experience any issues, this will almost certainly be the culprit.
Make a full backup of your old firmware overlay:
tar -C /overlay -cz -f /tmp/backup-$(date -I).tar.gz $(cat /proc/banktable/booted)
Move the backup to your PC by SCP or USB drive. Make sure you can open the backup archive and keep it in a safe place.
Please note, importing back this full backup on the new firmware is dangerous. This will come handy in future whenever you go back to the old firmware, or if you want to check how the old firmware was configured.
Run the command below to completely reset the overlay for your currently booted bank:
rm -rf /overlay/$(cat /proc/banktable/booted)
The above command cleans up the same files a regular RTFD would. We need to prepare a couple more things before rebooting, that's why we didn't use RTFD.
Don't stop here!
Your gateway's booted bank is now completely clean and reset to factory defaults, right now there is no more ssh root access enabled!. You should really keep the getaway on and proceed to the next step to avoid loosing root access.
Preserving root access
The below block of commands prepares a run-once root access setup script to be executed on the next boot. This is equivalent to redoing the entire hacking from scratch as if your gateway were never rooted before.
Run the following set of commands:
please note there is a long multi-line command here, paste it all at once
mkdir -p /overlay/$(cat /proc/banktable/booted)/etc
chmod 755 /overlay/$(cat /proc/banktable/booted) /overlay/$(cat /proc/banktable/booted)/etc
echo -e "echo root:root | chpasswd
sed -i 's#/root:.*\$#/root:/bin/ash#' /etc/passwd
sed -i -e 's/#//' -e 's#askconsole:.*\$#askconsole:/bin/ash#' /etc/inittab
uci -q set \$(uci show firewall | grep -m 1 \$(fw3 -q print | \
egrep 'iptables -t filter -A zone_lan_input -p tcp -m tcp --dport 22 -m comment --comment \"!fw3: .+\" -j DROP' | \
sed -n -e 's/^iptables.\+fw3: \(.\+\)\".\+/\1/p') | \
sed -n -e \"s/\(.\+\).name='.\+'$/\1/p\").target='ACCEPT'
uci add dropbear dropbear
uci rename dropbear.@dropbear[-1]=afg
uci set dropbear.afg.enable='1'
uci set dropbear.afg.Interface='lan'
uci set dropbear.afg.Port='22'
uci set dropbear.afg.IdleTimeout='600'
uci set dropbear.afg.PasswordAuth='on'
uci set dropbear.afg.RootPasswordAuth='on'
uci set dropbear.afg.RootLogin='1'
uci set dropbear.lan.enable='0'
uci commit dropbear
/etc/init.d/dropbear enable
/etc/init.d/dropbear restart
rm /overlay/\$(cat /proc/banktable/booted)/etc/rc.local
source /rom/etc/rc.local
" > /overlay/$(cat /proc/banktable/booted)/etc/rc.local
chmod +x /overlay/$(cat /proc/banktable/booted)/etc/rc.local
sync
Clean and rooted
Your gateway is now clean but will re-enable permanent root SSH access on the next boot. Please note, your SSH credentials will be changed back to root:root. Do not reboot the gateway and move on to the next section where you will finally flash the new firmware image.
Flashing firmware
Run these commands to write /tmp/new.bin image into booted bank and reboot soon after:
# Erase and write new firmware into booted bank
mtd -e $(cat /proc/banktable/booted) write "/tmp/new.bin" $(cat /proc/banktable/booted)
# Emulate system crash to hard reboot
echo c > /proc/sysrq-trigger
The last command above will intentionally make the Gateway to crash. Wait for it to reboot completely.
Completing setup
The Gateway should boot normally into the new firmware. Please review the following:
- Your bank plan hasn't been modified. If you are not sure the current bank plan is optimal, follow Bank Planning instructions.
- You should still have permanent SSH server on port
22. - Your root credentials have been reset to
root:root. MAke sure you change password now.
Something went wrong?
BOOTP usually allows you to recover in case of boot failure caused by bad firmware flashing. Chances of successful recovery are greater if you were on optimal bank plan. Please, use the same Type 2 firmware you had on bank_1 during root, we assume you remember which one it was since we asked you to take note. Otherwise, use another Type 2 one and cross your fingers. You will need to follow the rooting guide from scratch.